


In this post, we will explore the implementation of CRUD (Create, Read, Update, Delete) operations for Applications. As we continue, we will also delve into the world of Code First Migrations and tackle some common issues that can arise during the migration process.
Index for Applications
For a start, we will start building Index page for applications. Later on, we will build the rest of the pages such as Add, Update and Delete pages.
Data Access Layer
Let's add an entity class named Application in Entities folder.
Update content of Application class with the following code:
namespace Portal.Entities;

public class Application
{
    public int Id { get; set; }
    public string? Name { get; set; }
}
At the moment, the class has 2 properties, Id and Name.
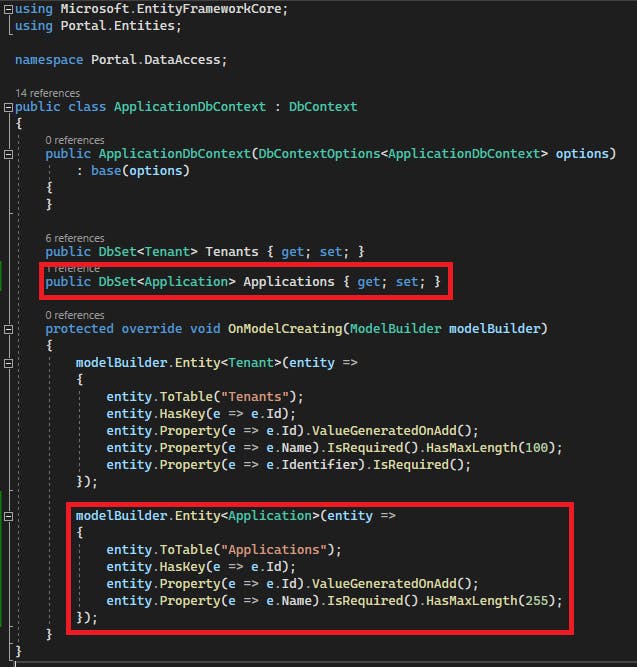
We also need to let our ApplicationDbContext to manage data access to this entity.
In DataAccess\ApplicationDbContext.cs file, add the following line:
public DbSet<Application> Applications { get; set; }
We also need to configure the data model for this entity.
In DataAccess\ApplicationDbContext.cs file, add the following lines in OnModelCreating method:
modelBuilder.Entity<Application>(entity =>
{
    entity.ToTable("Applications");
    entity.HasKey(e => e.Id);
    entity.Property(e => e.Id).ValueGeneratedOnAdd();
    entity.Property(e => e.Name).IsRequired().HasMaxLength(255);
});
It will map to a database table named Applications. Name property has a maximum characters of 255.
The final content of ApplicationDbContext.cs as shown below:
UI Layer
Let's add a view model class named ApplicationViewModel in Models folder. The purpose of this class is to display applications in a Razor Page which we will create later.
Update content of ApplicationViewModel class with the following code:
namespace Portal.Models;

public class ApplicationViewModel
{
    public int Id { get; set; }
    public string? Name { get; set; }
}
Create a new folder named Apps in Pages folder.
Add a new Razor Page named Index in Apps folder.
The content of this Index is very similar to Index from Tenants folder.
Update the content of Index.cshtml.cs with the following code:
using Microsoft.AspNetCore.Mvc.RazorPages;
using Microsoft.EntityFrameworkCore;
using Portal.DataAccess;
using Portal.Models;

namespace Portal.Pages.Apps;

public class IndexModel : PageModel
{
    private readonly ApplicationDbContext _context;

    public List<ApplicationViewModel> Applications { get; set; } = new();

    public IndexModel(ApplicationDbContext context)
    {
        _context = context;
    }

    public async Task OnGetAsync()
    {
        Applications = await _context.Applications.Select(x => new ApplicationViewModel
        {
            Id = x.Id,
            Name = x.Name
        }).ToListAsync();
    }
}
Update content of Index.cshtml with the following code:
@page
@model IndexModel
@{
    ViewData["Title"] = "Applications";
}

<div class="d-flex justify-content-between flex-wrap flex-md-nowrap align-items-center pt-3 pb-2 mb-3 border-bottom">
    <h1 class="h2">@ViewData["Title"]</h1>
    <div class="btn-toolbar mb-2 mb-md-0">
        <div class="btn-group me-2">
            <a class="btn btn-sm btn-outline-secondary" asp-page="Add">Add</a>
        </div>
    </div>
</div>

@if (TempData["Message"] != null)
{
    <div class="alert alert-primary alert-dismissible fade show" role="alert">
        @TempData["Message"]
        <button type="button" class="btn-close" data-bs-dismiss="alert" aria-label="Close"></button>
    </div>
}

<table class="table">
    <thead>
        <tr>
            <th scope="col">Name</th>
            <th scope="col">Action</th>
        </tr>
    </thead>
    <tbody>
        @foreach (var app in Model.Applications)
        {
            <tr>
                <td>@app.Name</td>
                <td>
                    <a class="btn btn-outline-secondary" asp-page="Edit" asp-route-id="@app.Id">
                        Edit
                    </a>
                    <a class="btn btn-outline-info" asp-page="Delete" asp-page-handler="Delete" asp-route-id="@app.Id" onclick="return confirm('Are you sure?')">
                        Delete
                    </a>
                </td>
            </tr>
        }
    </tbody>
</table>
Let's not forget to add a link to this new page in the side menu.
Locate Shared\_Layout.cshtml and search for the following code:
<li class="nav-item">
    <a class="nav-link" href="#">
        Apps
    </a>
</li>
Replace with the following code:
<li class="nav-item">
    <a class="nav-link" href="/Apps/">
        Apps
    </a>
</li>
Test Application
Press F5 to run the project.
If we navigate to Applications page, an exception page is thrown as shown below:

The exception is a SqlException type which indicates that this is a database issue.
At first, the message Invalid object name 'Applications' seems too vague to understand the actual issue. Objects in the database can include Stored Procedure, User Function, Table, etc.
However, in our case, it means there is no table called Applications which is true as we haven't figured out how to make changes to the database. If you refer to the previous code, we added this line of code entity.ToTable("Applications"); in ApplicationDbContext class to map Applications table which is yet to exist.
If we refer to our previous post, we have a method named EnsureCreated which creates an empty database. However, it is not able to make changes to an existing database.
There are a few ways to resolve this issue:
Drop and re-create the database. However, we wish to keep the existing data. It is certainly not a recommended way to a production database.
Explicitly modify the schema of the database. It can be done by using a SQL script. But this step is tedious and error-prone as we need to test the change script and make sure it doesn't have side effects such as accidentally modifying or deleting the table schema.
Use Code First Migrations to update the database schema. EF Core will help to auto-generate code and migrate the changes to our database.
As Microsoft recommends using Code First Migrations, we will use this approach to migrate changes to our existing database.
EF Core provides a set of tools which allows us to use in Package Manager Console (PMC) in Visual Studio. To install these tools, please run the following command in PMC:
Install-Package Microsoft.EntityFrameworkCore.Tools
Furthermore, since Microsoft continuously releases new versions of the package, it is advisable to ensure that all EF Core NuGet packages are of the same version.
To check the version of those already installed EF Core packages, right-click the project and select Edit Project File as shown below:
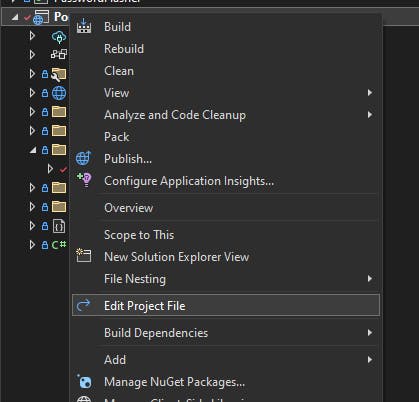
A XML file should appear in Visual Studio, look for something which begins with <PackageReference Include="Microsoft.EntityFrameworkCore... as shown below:

Notice that they are using version 7.0.12.
With this information, we can run the PowerShell command with specified version as shown below:
Install-Package Microsoft.EntityFrameworkCore.Tools -Version 7.0.12
Next, let's run the following command in PMC:
Add-Migration AddApplicationsTable
The command generates 2 files in a newly created folder named Migrations. You can learn more about those files here.

To migrate the changes, run the following following command in PMC:
Update-Database
However, there is an error while running the command.
Microsoft.Data.SqlClient.SqlException (0x80131904): There is already an object named 'Tenants' in the database.
The message indicates that EF Core was trying to create a table named Tenants which already there in our database.
Why?
When we inspect the code for <TimeStamp>_AddApplicationsTable.cs, there are 2 methods called CreateTable. Both methods are trying to create tables for Tenants and Applications. So when EF Core was trying to migrate changes to our database, it tried to re-create the Tenants table which caused the database error as shown above.
To fix this issue, we just need to comment on those lines which are creating and deleting the Tenants table as shown below:

Run the command Update-Database again in PMC and this time we should be able to see the new Applications table along with existing Tenants table.
To verify, open MS SQL Management Studio, and locate our database. You should see a new table named dbo.Applications created.

Notice that there is a new table named dbo.__EFMigrationsHistory. This table contains the historical migration information that we performed on this database.
Let's run the project again by pressing F5.
This time we should be able to load the Index page for Applications which were fetched from our database.
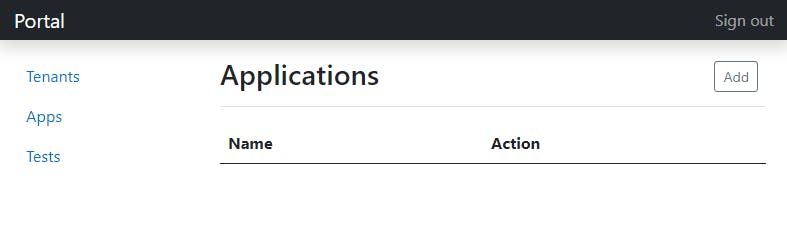
The table has no application which is normal as we haven't added any application to our database. We will implement the Add button functionality to the project in the next section.
Add for Applications
To add a new application, we need to create 2 files which are AddApplicationViewModel.cs and Apps\Add.cshtml.
In Models folder, create a new class file named AddApplicationViewModel.cs.
Update content of AddApplicationViewModel.cs with the following code:
using System.ComponentModel.DataAnnotations;

namespace Portal.Models;

public class AddApplicationViewModel
{
    [Required]
    public string? Name { get; set; }
}
Note that we assign RequiredAttribue to Name property to make it a mandatory field.
Next, create a Razor Page named Add in Pages\Apps folder.
Update content of Add.cshtml.cs with the following code:
using Microsoft.AspNetCore.Mvc;
using Microsoft.AspNetCore.Mvc.RazorPages;
using Portal.DataAccess;
using Portal.Models;

namespace Portal.Pages.Apps;

public class AddModel : PageModel
{
    private readonly ApplicationDbContext _context;

    [BindProperty]
    public AddApplicationViewModel Application { get; set; } = new();

    public AddModel(ApplicationDbContext context)
    {
        _context = context;
    }

    public IActionResult OnPost()
    {
        if (!ModelState.IsValid)
        {
            return Page();
        }

        _context.Applications.Add(new Entities.Application
        {
            Name = Application.Name,
        });
        _context.SaveChanges();

        TempData["Message"] = $"Application {Application.Name} added successfully.";

        return RedirectToPage("Index");
    }
}
Update content of Add.cshtml with the following code:
@page
@model AddModel
@{
    ViewData["Title"] = "Add Application";
}

<div class="d-flex justify-content-between flex-wrap flex-md-nowrap align-items-center pt-3 pb-2 mb-3 border-bottom">
    <h1 class="h2">@ViewData["Title"]</h1>
    <div class="btn-toolbar mb-2 mb-md-0">
        <div class="btn-group me-2">
            <a class="btn btn-sm btn-outline-secondary" asp-page="Index">Back</a>
        </div>
    </div>
</div>

<form id="addAppForm" method="post">
    <div class="mb-3 col-4">
        <label asp-for="Application.Name">Name</label>
        <input class="form-control" asp-for="Application.Name">
        <span asp-validation-for="Application.Name" class="text-danger"></span>
    </div>
    <div class="col-6 text-right">
        <input id="addApp" type="submit" class="btn btn-sm btn-outline-primary" value="Save" />
    </div>
</form>

@section Scripts {
    <partial name="_ValidationScriptsPartial" />

    <script>
        $(function () {
            $('#addApp').on('click', function () {
                $('#addAppForm').validate();
                if (($('#addAppForm').valid() === false)
                    return false;

                return true;
            });
        });
    </script>
}
That's it.
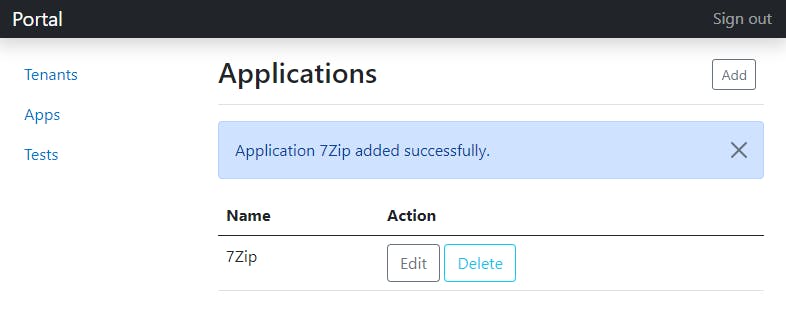
Press F5 to run the project. Go and click Add button to load Razor Page Add as shown below:

Enter a name for the new application and click Save button. A success message should appear on top of the table as shown below:
Edit for Application
To edit an application, we need to create 2 files.
Create a class file named EditApplicationViewModel.cs in Models folder and update the content of the file with the following code:
 using System.ComponentModel.DataAnnotations;

namespace Portal.Models;

public class EditApplicationViewModel
{
    [Required]
    public int Id { get; set; }

    [Required]
    public string? Name { get; set; }
}
Create a Razor Page named Edit in Pages\Apps folder.
Update content of Edit.cshtml.cs with the following code:
using Microsoft.AspNetCore.Mvc;
using Microsoft.AspNetCore.Mvc.RazorPages;
using Microsoft.EntityFrameworkCore;
using Portal.DataAccess;
using Portal.Models;

namespace Portal.Pages.Apps;

public class EditModel : PageModel
{
    private readonly ApplicationDbContext _context;

    [BindProperty(SupportsGet = true)]
    public int Id { get; set; }

    [BindProperty]
    public EditApplicationViewModel Application { get; set; } = new();

    public EditModel(ApplicationDbContext context)
    {
        _context = context;
    }

    public void OnGet()
    {
        var application = _context.Applications.Find(Id);

        if (application is null)
        {
            TempData["Message"] = "Application not found!";

            RedirectToPage("Index");
        }

        Application = new EditApplicationViewModel
        {
            Id = application!.Id,
            Name = application.Name
        };
    }

    public IActionResult OnPost()
    {
        if (!ModelState.IsValid)
        {
            return Page();
        }

        var application = _context.Applications.Find(Id);

        if (application is null)
        {
            TempData["Message"] = "Application not found!";

            RedirectToPage("Index");
        }

        application!.Name = Application.Name!;

        _context.Entry(application).State = EntityState.Modified;
        _context.SaveChanges();

        TempData["Message"] = $"Application {application.Name} updated successfully.";

        return RedirectToPage("Index");
    }
}
Update content of Edit.cshtml file with the following code:
@page "{id:int}"
@model EditModel
@{
    ViewData["Title"] = "Edit Application";
}

<div class="d-flex justify-content-between flex-wrap flex-md-nowrap align-items-center pt-3 pb-2 mb-3 border-bottom">
    <h1 class="h2">@ViewData["Title"]</h1>
    <div class="btn-toolbar mb-2 mb-md-0">
        <div class="btn-group me-2">
            <a class="btn btn-sm btn-outline-secondary" asp-page="Index">Back</a>
        </div>
    </div>
</div>

<form id="editAppForm" method="post">
    <div class="mb-3 col-4">
        <label asp-for="Application.Name">Name</label>
        <input class="form-control" asp-for="Application.Name">
        <span asp-validation-for="Application.Name" class="text-danger"></span>
    </div>
    <div class="col-6 text-right">
        <input id="saveApp" type="submit" class="btn btn-sm btn-outline-primary" value="Save" />
        <a class="btn btn-sm btn-outline-secondary" asp-page="Delete" asp-page-handler="Delete" asp-route-id="@Model.Id" onclick="return confirm('Are you sure?')">Delete</a>
    </div>
</form>

@section Scripts {
    <partial name="_ValidationScriptsPartial" />

    <script>
        $(function () {
            $('#saveApp').on('click', function () {
                $('#editAppForm').validate();
                if (($('#editAppForm').valid() === false)
                    return false;

                return true;
            });
        });
    </script>
}
Press F5 to run the project.
Click Edit button on one of the table rows in Applications page.
Change the name of the application and click Save button to update.
A success message should appear on top of the page like below:
Application <Name> updated successfully.
Delete for Applications
To delete an application, we just need to add a Razor Page named Delete.
Create a Razor Page named Delete in Pages\Apps folder.
Update content of Delete.cshtml.cs file with the following code:
using Microsoft.AspNetCore.Mvc;
using Microsoft.AspNetCore.Mvc.RazorPages;
using Portal.DataAccess;

namespace Portal.Pages.Apps;

public class DeleteModel : PageModel
{
    private readonly ApplicationDbContext _context;

    [BindProperty(SupportsGet = true)]
    public int Id { get; set; }

    public DeleteModel(ApplicationDbContext context)
    {
        _context = context;
    }

    public IActionResult OnGetDelete()
    {
        var application = _context.Applications.Find(Id);

        if (application is null)
            TempData["Message"] = "Application not found!";

        _context.Applications.Remove(application!);
        _context.SaveChanges();

        TempData["Message"] = "Application deleted successfully.";

        return RedirectToPage("Index");
    }
}
That's it. Press F5 to run the project.
Click Delete button one of the table rows in Applications page.
A success message should appear on top of the page like below:
Application deleted successfully.
Conclusion
In conclusion, we've successfully explored the implementation of CRUD operations for Applications in our .NET Core project. Additionally, we've gained valuable insights into the world of Code First Migrations and how to handle migration challenges. Armed with this knowledge, you're now well-prepared to build and manage your .NET Core applications effectively.